Thursday, April 28, 2011

Musing on Thrifted Knit Dresses, and a bit on Self Confidence

I briefly mentioned it in my love letter to a summer skirt post, but I've temporarily moved back to Kingston to finish off my thesis. It wasn't going well at home, and considering that I'd like to defend first week of June (which means submitting around May 21st) and I'm still got a ways to go, I figured this was my best option.

Of course, in typical Heather fashion, I decided to do this Friday at noon, and was on a plane headed to Ontario by Sunday evening. But it's worked out well since I'm both house-sitting and bunny-sitting for a friend while she's out of town, so I have the whole place to myself! The downside is that I've left all sewing distractions supplies in Manitoba to keep myself focused.

However, when I was in Manitoba, I went thrift shopping a lot, and found some great gems, all of which have made their way to Ontario with me. Two of my favourites were a couple of knit dresses that I fell in love with, and has encouraged me to wear more dresses this summer!


This first one is a simple grey dress that is ridiculously easy to wear. I've worn it around the house as a casual house dress, but I've also worn it out for lunch with friends and studying in the coffee shop. Would you believe that I paid $4.99 for it? The original price tag - still attached to the dress - was $40!

Although the length is normally too short for me, I'm actually getting more comfortable with showing more of my legs. This from the girl who never showed her legs at all until last summer! I've always had a problem with them, feeling like my calves were too big and chunky. It's strange, ever since my 30th birthday, I've been feeling more confident about myself, and stressing less about insecurities with my body that has always bothered me. Which is funny, because I'm at my heaviest, at the moment. But seeing all these pictures helps re-enforce that confidence, because if I'm honest with myself, I don't think that my legs - or the rest of me - look bad at all. Maybe a little chubby, but not like I've always pictured in my head. Funny how we do such a disservice to ourselves, eh?


Anyways, I also like this dress with tights, although looking at this picture, I think black is too stark. Should've paired it with my green or dark grey tights.


Now this black dress, I absolutely adore. I normally wouldn't have pulled this one off the rack, but I was feeling adventurous at Value Village, and was trying on anything that caught my eye. I was pleasantly surprised by this dress, and immediately needed to bring it home. And I paid a whopping $7.99 for it!


I adore the cowl neck, which is normally an issue with my bust size, but worked out well here. The tie helps define my waist where I'm the slimmest, while the pleated skirt just floats away and covers any extra bumps.


I adore both of these dresses, and they've convinced me that I obviously need to make more like them! Poking around, I've found New Look 6722 that might do the trick for a look similar to the black dress, although I'm not a fan of the faux wrap bodice.


Hmm, can't wait to be done with the Thesis. It's interfering with my sewing! Speaking of, guess I should get back to it.

P.S. I think that I need to work on my modeling skills. For instance, I could turn my face in the other direction once and a while! Maybe it's time to re-read Patty's advice on taking good photos.

Sunday, April 24, 2011

A Love Letter to a Summer Skirt

Pockets!

Oh my darling, I can not describe what you mean to me. You are beautiful, with your jewel-tone flowers and ivory background, you are a sight to be seen. When I saw you across the second-hand store, hanging out with the drapery, it was love at first sight. The other curtains paled in comparison to your brilliance!

Why did we waste so much time apart, my love? Why couldn't we have met long ago?

Decorative stitch along yoke facing.

Before that fateful day, I'd searched everywhere for you, for a fabric with just your spunk and character and joy for life. But I knew, as soon as I laid eyes on you, that you were the one. And oh, you looked so charming, done up as a curtain, made to adorn a window for all to see. But I knew you could be more! I knew what you were truly meant to be! A short summery skirt!

With you lovingly in hand, we searched the pattern books for ages to find the perfect skirt pattern that would show you off in all your splendor. But then, there it was, the perfect skirt to display you in all your loveliness: New Look 6873!

Oh, the simple lines, the slight flair, the yoke, the pockets! I think you knew it was perfect too, you practically put yourself together! Even installing your lapped zipper was like a dream! Before I knew it, you were born again as a beautiful summer skirt, and if it's possible, I fell in love with you even more.

Lapped zipper along right side, next to pocket. POCKETS!!

Finished all seams by zigzagging to reduce bulk.

I know I should be packing for my impromptu move back to Kingston today to complete the loathsome Thesis, but I couldn't stand the thought of leaving without you. With you at my side, I know that my dreaded task will be more bearable; nay, almost fun!

We were meant to be, my darling. I love you!

(I've been reading way too many romance novels of late.)

Tuesday, April 19, 2011

Finished Object (Sort of): McCall's 6826 Swiss Dot Blouse

My girl Marylin thinks I'm lookin' hot.

I've sort of been hinting at a blouse that I've been working on for a couple weeks now. It's McCall's 6286, version B with the 3/4 length sleeves. The only alterations I did to this top was omit the interfacing in the collar, facings, and cuffs. I wrote up a tutorial for dealing with buttonholes on thin, unstabilized fabric, in a blog post here and at PR here.

It's been a gradual project that I've taken my time with (a novel concept, for me). Well, I sort of finished it the other night, and I'm quite disappointed.

Cropped my face due to the stupidest expression ever. Durrpp.

NOTE: This is the true colour of the shirt. Because of lighting issues and some adjusting, the colour in the pictures range all over the place.

You might notice the lack of buttons on the front. That's because I can't be bothered to put the time and trouble into making them right now. Once I had the entire thing together, I tried it on and discovered a few things:

1) The sleeves are too long!

Marilyn is laughing at my despair, the wench.

I'm pretty certain I don't have stubby arms (chubby, maybe, but they're not short), so I don't get why these supposedly 3/4 length sleeves are actually about 1.5 inches short of being full length. There is a tab sewn on the inside of the sleeve (not shown) that allows you to roll up the sleeves, but I'm sort of disappointed in this. If I were to make this blouse again (questionable, right now), then I'd definitely shorten the sleeve about 2 inches.

2) Uh...Hello there belly, you're not supposed to be showing:

Yeah, I'm not a fan. This may be the biggest deal breaker for me. Maybe having a touch of belly showing might be appropriate if I were 18, but at 30, I'm just not crazy about this. And those pants are about 1 inch below my belly button, too. I guess I could wear a cami underneath, but the whole point to this project was to make a light, airy blouse for summer. I don't want to wear a hot cami underneath! Granted, when the belt is tied up at the front, you can't see it, but that's not the point.

3) Speaking of the belly area, the 'v' shaping at the bottom is really unflattering!

I've tried this top with various jeans and skirts, and I can't find any combination that makes that front inverted 'v' look flattering. It looks like my hips were too big to keep the front at the bottom closed! Maybe I'm being overly critical, but it reminds me of too many tops that don't account for hips on a woman, and pull open as a result (sorry for the not-helpful picture). I think this part is a miss for anyone who is a little more curvy than average on the bottom.

4) Major fabric pooling at the upper back region

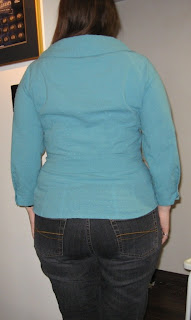
The collar looks weirdly high here, but that's because I've pulled down on the front a bit. Usually the collar sits a bit lower on my neck.

There are 4 vertical darts in the back, and they cause some fabric pooling across the upper back. If I pull the front of the top down a lot, it sort of goes away, but not completely, and then the front of the shirt hangs weird. Maybe the darts need to be extended upwards, or maybe even let out a little bit? No idea.

It's really hard to take a picture of your own back.


5) Slightly too small

Okay, so I admit, I've put on a bit of weight the last couple weeks (I blame thesis stress), so the whole thing is a little snug. That's my own fault, and maybe I'll dislike this less when (yes when!) I shed a few pounds again. I cut a size 16 according to my measurements (at the time), and it seemed to hold true to size. I'm...just not the same size anymore. Ooops!


Despite all this, there are things I do love about this shirt. I adore this fabric. It's a lovely turquoise swiss dot with an interesting texture to the fabric. The neckline is just lovely, and I'm pleased not to have major cleave problems. It screams for a pretty pendant or something, eh? Maybe a lacy necklace like this one by Disney at Ruffles and Stuff.

I'm not normally this red, at least not before summer time and the sun and I have battled it out (I usually lose).

I'm also kind of stupidly proud of these cuffs. Even without interfacing to stiffen them up, they turned out really lovely. Look at that placket! (Please excuse the different buttons. I was trying out different button styles. If I ever finish this, I'll be using the white glass ones shown here.)

I finished all inside seams except for the dart at the top of the sleeve at the shoulder. Everything was done by french seams, including where the raglan arm attached to the bodice. French seams are remarkably easy to do and looks quite nice. Especially if you use matching thread (which I only did for half the project because I was too lazy to go buy turquoise thread).

French seams everywhere! Note how I (totally unintentionally) arranged it so that the side seam and sleeve seam flipped on opposite sites to reduce bulk? I need to remember that for next time. Also note the ugly contrasting white thread? Ooops.

A heads up, though. If you're not a fan of handsewing, you're going to hate this. You're supposed to slipstitch the front facings and the collar down. I actually enjoy it, and worked on it while watching a tv show (or two).

Look at all those darts! Eight vertical darts in all! Here's a tutorial for lining up the seam lines.

While I found the instructions to be decent, overall, the collar was a bit of a headache. All I can say is make sure you draw on and line up the markings perfectly. Mine went on alright (after a small but curse-filled battle), but there's some mistakes. Like a seam showing on the collar below (that, while visible, thankfully blends in).


My dear lovely readers, I'm walking away from this blouse. For now, anyways. Maybe I'll come back to it later on and shorten the sleeves, add buttonholes and buttons (I have the buttons already in a baggy and pinned to the shirt - yay organization!), and play around with the back darts.

For now, I'm moving on to a couple, much more simple projects. Keep an eye out for more summery garments!

Happy sewing all!

Monday, April 18, 2011

I Won I Won!

Patty from over at The Snug Bug recently passed the 200 follower mark, and decided to celebrate by hosting a BBQ giving away a wrist pincushion (made by Sunni at The Cupcake Goddess; you can check out her Etsy shop here) for one lucky follower.

AND THAT LUCKY FOLLOWER IS ME!! Yay lucky number 9!

Thank you so much Patty, and congrats on having such a wonderful blog that so many of us enjoy following! I know I've learned a lot from you, and thoroughly enjoy your upbeat and interesting posts.

Dear Readers, I'm serious when I suggest checking out Patty's blog The Snug Bug. It's a delight to read, and I'm not just saying that because I won something from her! I mean, look at her ridiculously adorable assistant (got to make sure there's enough white hairs everywhere) and photo shoot accessory. How can you resist those ears?!

Monday, April 11, 2011

Tutorial: Stabilizing Thin Fabric for Buttonholes

I have a tip for you about buttonholes. Or rather, stabilizing thin fabric so that it doesn't get sucked into the depths of your sewing machine while making the buttonhole!

On the garment I'm working on, I chose not to use the recommended interfacing, as I want this to be a very airy, casual summer piece. (No stiffness allowed!) However, it has something like 11 billion buttons with accompanying buttonholes, and I'm using a very lightweight cotton swissdot. On all my practice runs, the fabric got eaten by the machine.

I've heard of some people using tissue paper to stabilize fabrics during sewing, but I didn't have any on-hand (that I was willing to destroy). I did, however, have some fusible hem web. This stuff is very thin but strong and smooth enough to resist being pulled into the machine.


Stabilizing Thin Fabric for Buttonholes

1) Mark the location of the buttonhole with a ballpoint pen fabric marker, something darker that you can see through the hem webbing.

2) Baste stitched two strips of the hem webbing on either side of the fabric. Make sure there is enough room for the buttonhole!


3) Stitch your buttonholes.

Please, no comment on how crooked mine are. This is a tutorial on stabilizing thin fabric, not on making perfectly straight buttonholes. I'm not using my own machine, and the Kenmore buttonholer is driving me bonkers!


4) Pull out the basted stitching and simply tear off the fusible hem web! The stuff I used was very thin, so it tore off very easily.


5) Cut your buttonhole, and c'est finis! A (hopefully) lovely buttonhole without it become dinner to the feed dogs. Or if the buttonholes are wonky like mine because you are incapable of lining them up correctly, find some shiny buttons to distract!

Who knew cutting buttonholes could be so pretty! Perfect focus is perfect, yo.


Now, I know there is a chance that not all of the fusible web has come off, but when I went to iron the buttonholes after this picture was taken, I just put a press cloth on top of it. Any residual stickiness seemed to go away. I imagine this would work just as well with some left over pattern tissue paper, anything thin that would tear away easily.

I hope this was helpful! If not, well, at least it's here for prosperity, right? :)

Monday, April 4, 2011

Tutorial: Lining Up the Seamlines of a Dart

I'd like to share a tip on how to line up and pin the seam lines of darts, particularly on long vertical darts often seen on blouses and dresses. Every time I've had to sew them, I have a heck of a time matching up the seam lines properly, and I finally worked out a trick.


1) Mark Your Darts

On the back of your fabric, mark the locations of the small circles along the dart, as indicated on the pattern piece. Try to keep these dots small. I usually stick a pin through the centre, then draw with a ballpoint pen fabric marker or chalk directly below where the pin enters the fabric. Then "connect the dots", marking where the dart seam line will be (preferably with a different colour, but just make sure you don't obscure the dots).


2) Pin the Dots on the Donkey Darts

Take a pin and push it through the two dots directly across from each other on either side of the dart. Best to use long pins if possible, depending on how wide the dart is. Do this for all dots.

In addition, put a pin through the dot at the top of the dart where the seam lines connect, only catching where you marked the dot. This will help you when you fold the dart.


3) Pinchy Pinchy!

At each pin, pinch the fabric so that the two dots on either side of the fabric are touching, pierced on the pin, as shown below. Make sure that you haven't twisted the fabric and that the pin is going straight through the fabric.

Then simply bring the pointy end of the pin through the fabric below the dot, with the head of the pin over the edge of the dart. Do this for all pinned dots.

Complete the fold along the dart, then lightly press the fold flat. Add more pins along the dart, if needed.


4) Double Double Toil and Trouble

Double check to ensure that the seam lines are lined up properly, otherwise it could cause toil and trouble (and seam rippers). Sometimes the fabric shifts when you bring the pin back through the fabric, so it's always good to check. To do this, push a pin through the seam line on one side of the fabric, and make sure it's coming out through the seam line on the other side.

If the seam lines do not line up perfectly, then adjust the fabric until it does. I usually find that if it does shift, it's only by a tiny amount.


5) Sew Sew Sew Your Dart (Gently Down the Seam-Line)

Now all that you need to do is sew the dart! Et voilà, a perfectly lined up seam line for a perfectly sewn dart! Well, if you manage to sew it straight, which is usually where I go wrong. Sorry, I haven't any tips to help you out with that!

Friday, April 1, 2011

I Don't Wanna Stash this Fabric!

Okay lovely readers, I need your advice.

I have about 2 m left of this cotton voile left over from the Mariana Trench Dress, a result of both over-estimating what I needed and taking the extra 3/4 m left on the bolt, and I need to do something great with it. I love this print.

It's very light-weight, so whatever I make with it will have to be lined or worn with something underneath. I've got a few ideas:


1) McCall's 6286 blouse

I like the lines of this blouse, and I could probably get away with either lining it with some white cotton voile or wear a cami underneath. I think the fabric print is too big for this shirt, though. What do you think?


2) Make a simple skirt

I'm inspired by quietandsmall's pretty skirt (here's another view). I love this skirt and I think it would show off the print very nicely. It'd be an easy project, too, other than having to insert a zip.


3) A day dress?

This might be best since it's such a large, busy print, and a day dress would be a great addition to my summer wardrobe. Maybe I should take some inspiration from Stacie Thinks She Can (who is making the cap-sleeved version out of a lovely striped searsucker I'm coveting), and make the sleeveless dress from New Look 6803. The reviews for it are generally pretty good. Maybe with a black belt?


Help me, dear readers! You're my only hope!

Or at least, I value your opinion. :)
Related Posts Plugin for WordPress, Blogger...